The KS47 is a fantastic platform, but it has some frustrating quirks. The quirk that frustrates me the most is the lack of an over-insertion stop for the magazine. Why is such a feature needed? WELL, the KS47, as currently designed, has no means of preventing the nose of a magazine from moving up into the upper receiver. If any force acts upon the magazine, it will press into the bolt carrier, creating enough friction to prevent cycling, and thus binding up, causing a failure to eject or failure to feed malfunction. So why hasn’t Palmetto State Armory addressed this issue? Well, they wanted to make the upper work with standard AR-15 lowers and magazines as well, so an over-insertion stop would prevent a standard AR-15 magazine from being seated all the way in. If you are like me, however, you are not interested in such blasphemy. AS OF THE DAY I POST THIS (February 24, 2017), I HAVE YET TO FIND ANYONE SUGGESTING A REAL SOLUTION. Today, all of that changes. I will show you a simple modification to rectify this design flaw.
PLEASE NOTE: This modification only applies to the Gen 1 KS47. Gen 2 upper receivers have stops milled into the receiver, so this modification is not necessary for Gen 2.
BE AWARE: MODIFYING THE UPPER RECEIVER WILL DEFINITELY VOID WARRANTIES, POTENTIALLY DAMAGE YOUR GUN IF DONE WRONG, SUMMON SATAN, AND POTENTIALLY DO ALL KINDS OF OTHER THINGS THAT I REFUSE TO BE HELD RESPONSIBLE FOR. PERFORM THIS MODIFICATION AT YOUR OWN RISK. With that being said, if you do it correctly, there is nothing to worry about. In fact, the worst that can happen is you’ll have a hole in your upper receiver, which you can always plug with a set screw… I digress…
You will need the following tools:
- An electric drill (a drill press is recommended to keep things square)
- Bench or drill press vise
- An #8-32NC tap and tap handle.
- 1/8” Drill Bit
- Tap cutting fluid
- One (1) #8-32 Button Socket Cap Screw (5/16″ length with black oxide finish)
- (OPTIONAL) One (1) #8-32 set screw (flat point recommended)
- A screwdriver with the same drive as the screws (hex, torx, etc.)
- A set of calipers (dial or digital; doesn’t matter)
- White color pencil (or a regular pencil)
- 82˚ Countersink
- Metal file or Dremel with grinding wheel
- Thread locker (blue Loctite will work perfectly for temporary, red for permanent)
Why button socket cap screws? Aesthetic reasons, primarily. They are commonly used in the firearms industry for handguards and optic mounts, and once installed, it won’t look out of place on the firearm.
HERE WE GO:
Step 1:
With your bolt carrier removed, assemble your upper and lower. Insert a magazine and lock it into the gun like you normally would. Then, look through the ejection port into the upper receiver. While holding the nose of the magazine down (by pulling down on it), at the front of the magazine inside of the upper receiver, use a white colored pencil scribe a line along the inside of the receiver at the front of the magazine to outline the level at which the nose of the magazine should stop.
Remove the upper from the lower and insert the bolt carrier back into the upper. You should see the line scribed on the inside of the receiver. Using the white pencil, scribe along the inside of the upper receiver at the bottom of the bolt carrier. This will establish your working space: how much room you have between the magazine and the bolt carrier. This will help keep your mind at ease once you start drilling holes.
Step 2:
On the outside of the receiver, use your calipers to measure 0.887″ from the front of the receiver, and scribe a vertical line. Then, along your scribed line, measure 0.2455″ from the bottom of the upper receiver and mark that measurement perpendicularly over the vertical line. Where the two lines meet will be the center point of your to-be 1/8″ hole.

Step 3:
Secure the upper in the vise as level and square as possible. If you are not using a drill press and want to guarantee center, center punch where you want to drill, and then make your first hole with a 1/16″ drill bit. If you are using a drill press, you don’t need to center punch. I do recommend starting with the 1/16″ drill bit, though. After you drill the 1/8″ hole, if it was done square to the receiver, the hole should be touching the bottom line scribed on the inside of the receiver.

Step 4:
Once you finish drilling through, use the #8-32 tap to thread the hole. Go slowly and use plenty of cut fluid. Back out frequently to remove metal chips and apply more cut fluid.


Once finished, you should have a beautifully threaded hole:

Before I bought the correct screws, I tested the placement of the hole with another #8-32 threaded item I had and verified bolt clearance. As you can see, the bolt carrier is quite clear of the screw, with plenty of room to spare:

Step 5:
Now, I failed to take photos of this step, so please bear with me. Using the correct screw, thread in the #8-32 button cap screw by hand all the way until it stops. You should not need to force it at any point for the cap of the screw to sit flat on the receiver. If it stops short of sitting flat to the receiver, it means that the screw’s threads stop short of the screw cap. You will need to chamfer the hole with the countersink to get it to go the rest of the way. I did this by hand, but you can chuck the countersink in a drill and remove material in VERY SMALL INCREMENTS. Each time you remove material, thread the screw into the hole again to see if it fits flat. A good test to check is to hold the receiver up to a light and look from the side. If you see light peeking through the underside of the screw cap, it’s not sitting flat. Repeat this process until it fits snugly onto to the flat of the receiver.
Step 6:
Once you’ve finished drilling, tapping, and chamfering apply a drop of blue Loctite (yes, I mean the actual Loctite brand) to the screws (preferably toward the head of the screw and not the portion that will be exposed inside of the receiver). If you want a 100% permanent installation, as in you never want to move it again, apply red Loctite. Don’t over tighten the screw, because you REALLY don’t want to strip the threads. You can probably torque about 10 to 15 in-lbs and be safe.
Now that you’ve got the screw locked in place, assemble your upper and lower, sans bolt carrier. Once assembled, insert a magazine and lock it in place. It should NOT take extra force to lock in place. If the magazine does not go in with ease, you will need to remove some material from the bottom side of the screw with a metal file. I had no issues, so the end product should look like this:


If you are still getting vertical wiggle, you didn’t quite drill the hole square to the receiver, and will have to add material to the screw. You can add a dab of JB Weld to the bottom side of the screw, and hone it down to the appropriate size when it fully cures.
Step 7:
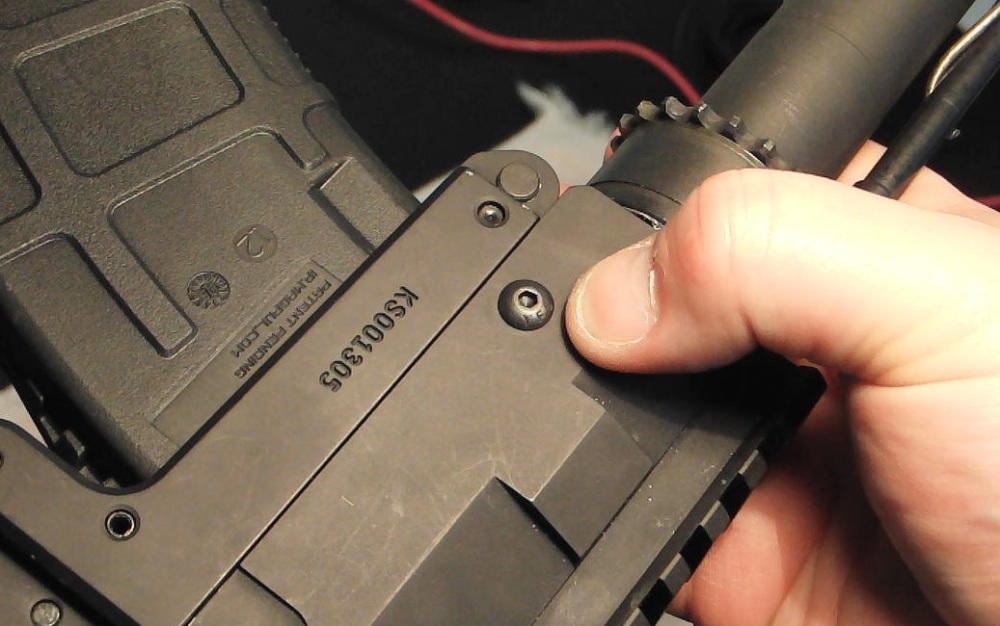
Now, the screw should only extend out enough to cover the walls of the magazine, but not extend into the opening of the magazine. The 5/16″ screw should give you the perfect length, but if you got a 3/8″ screw instead and it’s too long, separate the upper and lower and file down the end of the screw until it reaches the appropriate length.
Once you have verified the screw is at the perfect length, the modification is complete. The screw will be in the perfect position for both Magpul and steel magazines. I have yet to try any Tapco, Bakelite, or any other magazines, but steel and Magpuls work perfectly.
Objective Complete! YAY!
But wait… Why am I only putting a stop on one side? Well, the magazines fit pretty tight in the upper, and it doesn’t appear that rocking the magazine back and forth moves the magazine enough to contact the bolt carrier. HOWEVER, if you are a perfectionist, you will need to remove your dust cover, then perform the same drilling and tapping procedure on the ejection port side of the gun, but instead of using a button cap screw, you will have to use a 5/16″ #8-32 socket set screw. Do not chamfer the hole on this side because you won’t need to. Also, if you use a black set screw, it will blend in with the rest of the gun, and you won’t need to paint over it.
Why a set screw? Because there won’t be enough clearance for the dust cover if you use a button socket cap screw. The upside to the set screw is that you won’t need to file it to length; just thread it to the proper place, and that’s it. Since there won’t be a screw cap to torque against, be sure to use plenty of Loctite on that set screw to make sure it’s securely fastened in place (and let it cure overnight before you mess with the gun any further). It won’t be nearly as aesthetically pleasing on the outside, but it will function properly on the inside.


As I mentioned at the beginning of this post, Palmetto State Armory fixed this issue in the Gen 2 KS47 firearms. They should have just done it from the beginning, but who am I to complain?

Glad to see this blog getting updated again. Keep ’em coming!
LikeLiked by 1 person
Thanks for the video and the walk through. I used this this morning and your measurements are perfect. PMags lock up SOLID with no wiggle at all, while also still providing for easy insertion. Excellent work!!!!
LikeLiked by 1 person
Finally a good solution! I just performed this procedure on my KS47 and the mags are now rock solid. Minor filing of the screw to set the proper lockup but well worth it. Kudos Sir very clever!
LikeLiked by 1 person
Excellent write up. I just tried it on my ks47 and it worked perfect. The mags sit very solid in place. Thanks for taking the time to do this write up and for the excellent detail.
LikeLiked by 1 person
Since you’ve toiled with one of these extensively. In your opinion could one simply mill a standard AR upper to accept the 2mm wider AK mags and retrofit it with use on the PSA47 lower?
LikeLike
Well, not a mil-spec upper, but a larger billet upper, you can mill it out for AK mags. I worry about receiver integrity, however, as it only leaves about a single millimeter of material on either side, which could easily get bent in or tear out over time. But otherwise, yes, you can. People have already done it and have videos about it on Youtube. I find it easier just to use the KS47 upper. Modifying the KS47 upper is WAYYY simpler than milling out a standard upper. AND, if you have a milling machine, you could do this KS47 upper modification stupid easy.
LikeLike
Sick! Thanks for the input man!
LikeLike
So what I’m gathering is don’t send it back to PSA even when they say that they will fix the issue. If they’re not going to do the modification, then I’d rather not send it back to them and do the modification myself (and void the warranty). I mean the mod is straight forward. and I’ve got the proper tools to do it…
LikeLike
The new Gen2 KS47 apparently has remedied the over-insertion issue (upper modified), as well as the magazine shaving issue (rounded the offending lugs). Might pick up one of the new uppers to compare against my Gen1. I need a spare BCG so one of those will be on the list as well once they start selling parts for the Gen2 (only selling complete rifles right now).
LikeLike
I just saw this yesterday as well! I’m happy to see that PSA is getting their stuff together, finally!
LikeLike
Saw this last week and decided to do it today, I used a M4 x 8mm screw instead of the 8/32 x 5 1/6 since I drilled the whole a little on the low side, it end up being perfect! I can even insert a metal mag and it locks up solid, no wiggle at all! Thanks for the awesome video!
LikeLike
Hole not whole the phone auto corrected my post! 🤦🏻♂️
LikeLike